Git – By example
So, here we go again!
Our purpose here is to present and walk through this great VCS, Git. Initially we introduce the concept of a Version Control System and justify its use. Then we talk a little about the most common Git workflow.
In this guide we focus on users running GNU/Linux and interested in the command line. This is just the author’s preference and should not be understood as the only way (or even the best way) of using Git. Moreover, we do not cover the installation process, since it may be different for each system (for example: apt-get install git for Ubuntu, pacman -S git for Arch, and so on). So, before you continue, take a look at this page or some equivalent for your distribution.
What is a Version Control System (VCS) and why should you care?
A version control system records changes to a file (or set of files) over time. This way, you can recall specific versions later. Moreover, it makes it easier to work with other developers, revert files back to a previous state, compare changes over time, see who modified what and when, and more. If you screw things up, you can easily step back with very little overhead.
What is Git?
In April 2005, Linus Torvalds, the same person who created Linux some years before, published the very first version of Git.
As the Linux kernel is a very large and complex project, it needed a proper VCS. From 2002 to 2005, the community used BitKeeper, a proprietary VCS, for the entire project. However, the relationship between the company that owned the software and the Linux community broke down.
Git was born in this scenario, and since it had to support the entire Linux kernel project, it was designed from day one to be incredibly fast, very efficient with large projects, and great with non-linear development.
Nowadays, Git is the most widely used VCS.
Git’s three states
Some say that this is the main thing to remember about Git. Others say that, if you need to remember something, then remember this. I just say that this is important.
Git has three main states that your files may be in:
- Modified: the data was changed but not committed.
- Staged: the modified data is marked to go into your next commit snapshot.
- Committed: the data is stored in your local database.
We can also define the untracked state, where the file is not even tracked by the repository.
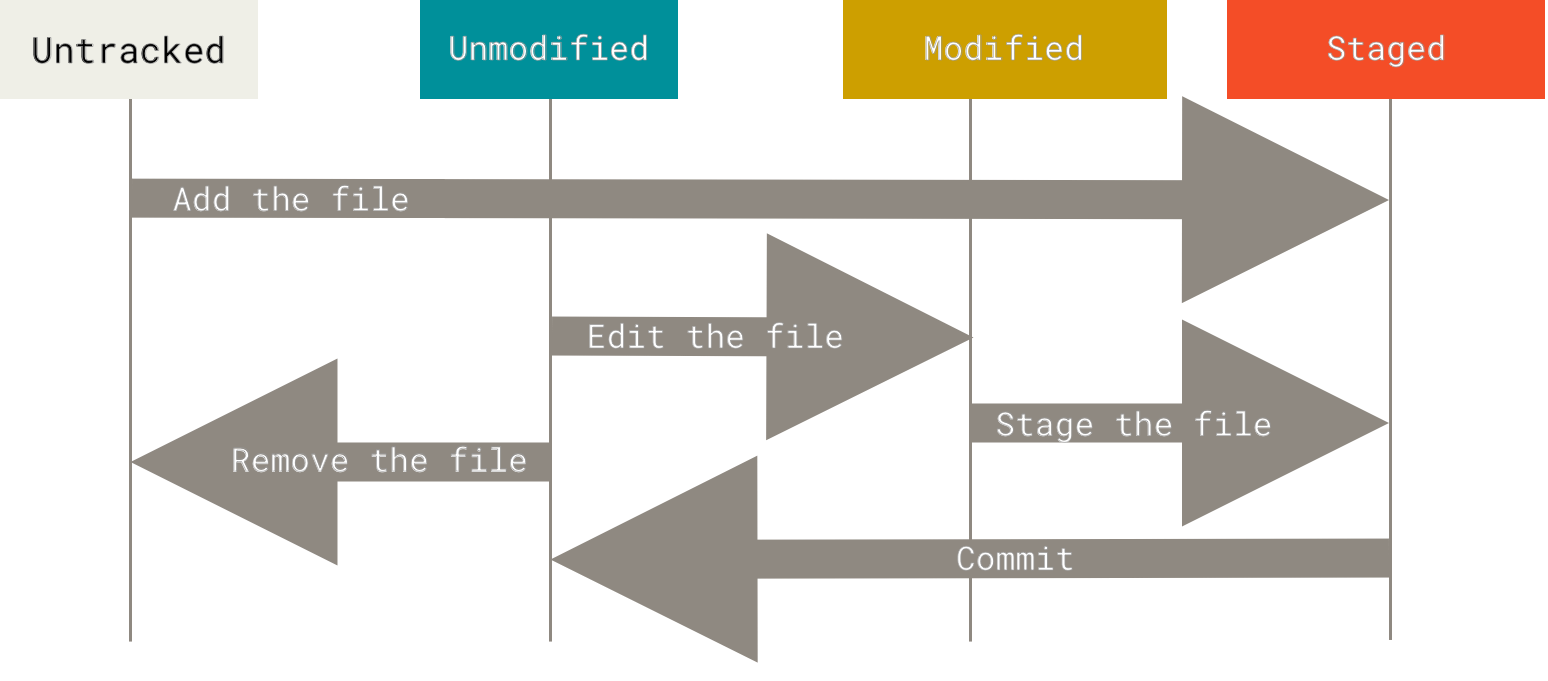
The lifecycle of the status of your files. Image from the Git documentation.
The basic Git workflow goes something like this:
- You modify files.
- You stage the files.
- You commit.
Make your bed and brush your teeth
Initially, you will want to set your identity. This is important because you will use this information in every commit. Moreover, you may also want to change the default text editor and other settings.
We can do this using the git config command. For the settings mentioned, we do:
git config --global user.name "Your name"
git config --global user.email "your@email.com"
Git uses nano as the default editor. If you want to change it to something else, for example vim, you use:
git config --global core.editor vimTip: try using Tab, or your autocomplete shortcut, to explore all
git configpossibilities. Or readman git config.
Take off
Now we will cover the case where you want to create a brand new repository (the place where everything will be stored). So, your code may or may not exist, but you will initialize your commits from scratch.
First, we need a root folder. We will create ours in git/helloworld/:
mkdir -pv ~/git/helloworld
cd ~/git/helloworld
Now we need to initialize the repository:
git initYou can check that everything is OK by doing:
git statusYour output should be something like this:
On branch master

Initial commit

nothing to commit (create/copy files and use "git add" to track)
Adding a remote repository
There are many places on the internet where you may store a copy of your repository. You may do this to back up or share your code, or for any other reason you can imagine. We mention GitHub and Bitbucket, but there are a lot of options. You may even use a local directory for that.
Everything about adding, removing, and managing the remote repositories for your code refers to git remote. We will use as an example our test repository on GitHub: https://github.com/pdroalves/helloworld. Again, for simplicity, in this article we will not cover GitHub-specific tasks, like creating repositories or setting up your account.
To add a new repository, we use its address https://github.com/pdroalves/helloworld.git and do:
git remote add origin https://github.com/pdroalves/helloworld.gitThis will add to your local repository a reference to a remote one that will be referenced by origin. If someday you want to remove it:
git remote rm originNotice that both repositories must already exist before you link your local one. Moreover, you may replace the GitHub link in our example with some local folder, like git/helloworld.
To check your remotes, use:
git remote -vCloning a repository
We know how to create a repository and add remotes. But what if we want to download an existing repository? This is done with git clone:
git clone https://github.com/pdroalves/helloworld.gitThis will create a directory with the repository name (for example, helloworld), download all repository data, and add the original address to the remote repository list as origin.
add, commit, modify, add, commit, …
Now we have a Git repository. Let’s add something to it. I propose a very basic, traditional (and useless) Python hello world:
echo 'print("Hello world!")' > hello_world.pyAt this moment, hello_world.py is in an untracked state. Let’s add it to the repository:
git add hello_world.pyGood. Now it is in the staged state. Run git status again and see for yourself: it will be taken in the next commit. Commit it:
git commit -m "Initial commit."Great. Your first commit! Check it:
git logNow let’s try something else. Make some change to hello_world.py and add it to the staging area:
echo 'print("I see you o/")' >> hello_world.py
git add hello_world.py
And make another change, but this time do not stage it:
echo 'print("Bye world.")' >> hello_world.pyRunning git status again, we have:
On branch master
Changes to be committed:
  (use "git reset HEAD <file>..." to unstage)

        modified:   hello_world.py

Changes not staged for commit:
  (use "git add <file>..." to update what will be committed)
  (use "git checkout -- <file>..." to discard changes in working directory)

        modified:   hello_world.py
Now we have three versions of hello_world.py. The first one, and oldest, is committed in our repository. The second is in the staging area, waiting to be committed or changed. The third and last is in the modified state. If you commit right now, Git will commit the first modified version (with “I see you o/” in it).
However, if you want the most recent version, you need to add it again to the staging area. This happens because, when a file is added to the staged state, Git makes a copy of it and puts it somewhere safe (but not as safe as in the committed state).
git add hello_world.py
git commit -m "My first modification."
And then we have again only one version of our file.
Tip: As you may see, in this article we always use the
-mparameter withgit commit. This is a didactic choice and makes it easier for us to explain some ideas. In daily work, this is often a bad practice. The very purpose of commit messages is to explain to someone else (or even your future self) what you did in that commit, and-mtempts you to write just a few words instead of something more enlightening. In daily work, get used to omitting this parameter and do not be lazy about writing what you actually changed in that commit.
Pushing and pulling
If you are working with a remote repository, you will obviously want to send and receive new commits to it.
Usually you will want to first receive any new commit that was made while you were working. You do this by pulling from your repository:
git pull originThis step may result in a merge. We will talk about that later. Hold on!
If everything is OK, now we push our new commits:
git push originLet’s take a branch
Until now, we only considered a very basic and unusual scenario where the development process is straight and lonely. In the real world, we have something much less predictable and well behaved.
Again, for simplicity, I will not talk about implementation details or anything very complex about how Git works. However, to understand branching, we need to talk about the hierarchy of commits.

Commits and parent pointers. Image from the Git documentation.
Every commit you create holds a pointer to the commit that came before it. The main line of commits of our project is called master by default and is set as our default branch.
However, let’s suppose the following context:
- You have working code.
- You start working on a new feature.
- You receive a call about another critical issue that needs a hotfix immediately.
If you are a careful developer, you know that it is not a good practice to leave your current work as it is, jump to another part of the code to fix the issue, and then come back to the original feature you were implementing. Sometimes this can introduce new bugs. Sometimes this can prevent you from testing your hotfix efficiently. Sometimes this can even prevent you from deploying your hotfix.
As a solution, we work with branches. The usual workflow for this is:
- You have working code.
- You create a new branch called
new_amazing_feature. - You start working on a new feature.
- You receive a call about another critical issue that needs a hotfix immediately.
- You commit your progress and check out the
masterbranch. - You implement and commit the hotfix to the
masterbranch. - You check out the
new_amazing_featurebranch again and resume the work. - At the end, you commit your completed feature and merge it with the
masterbranch.
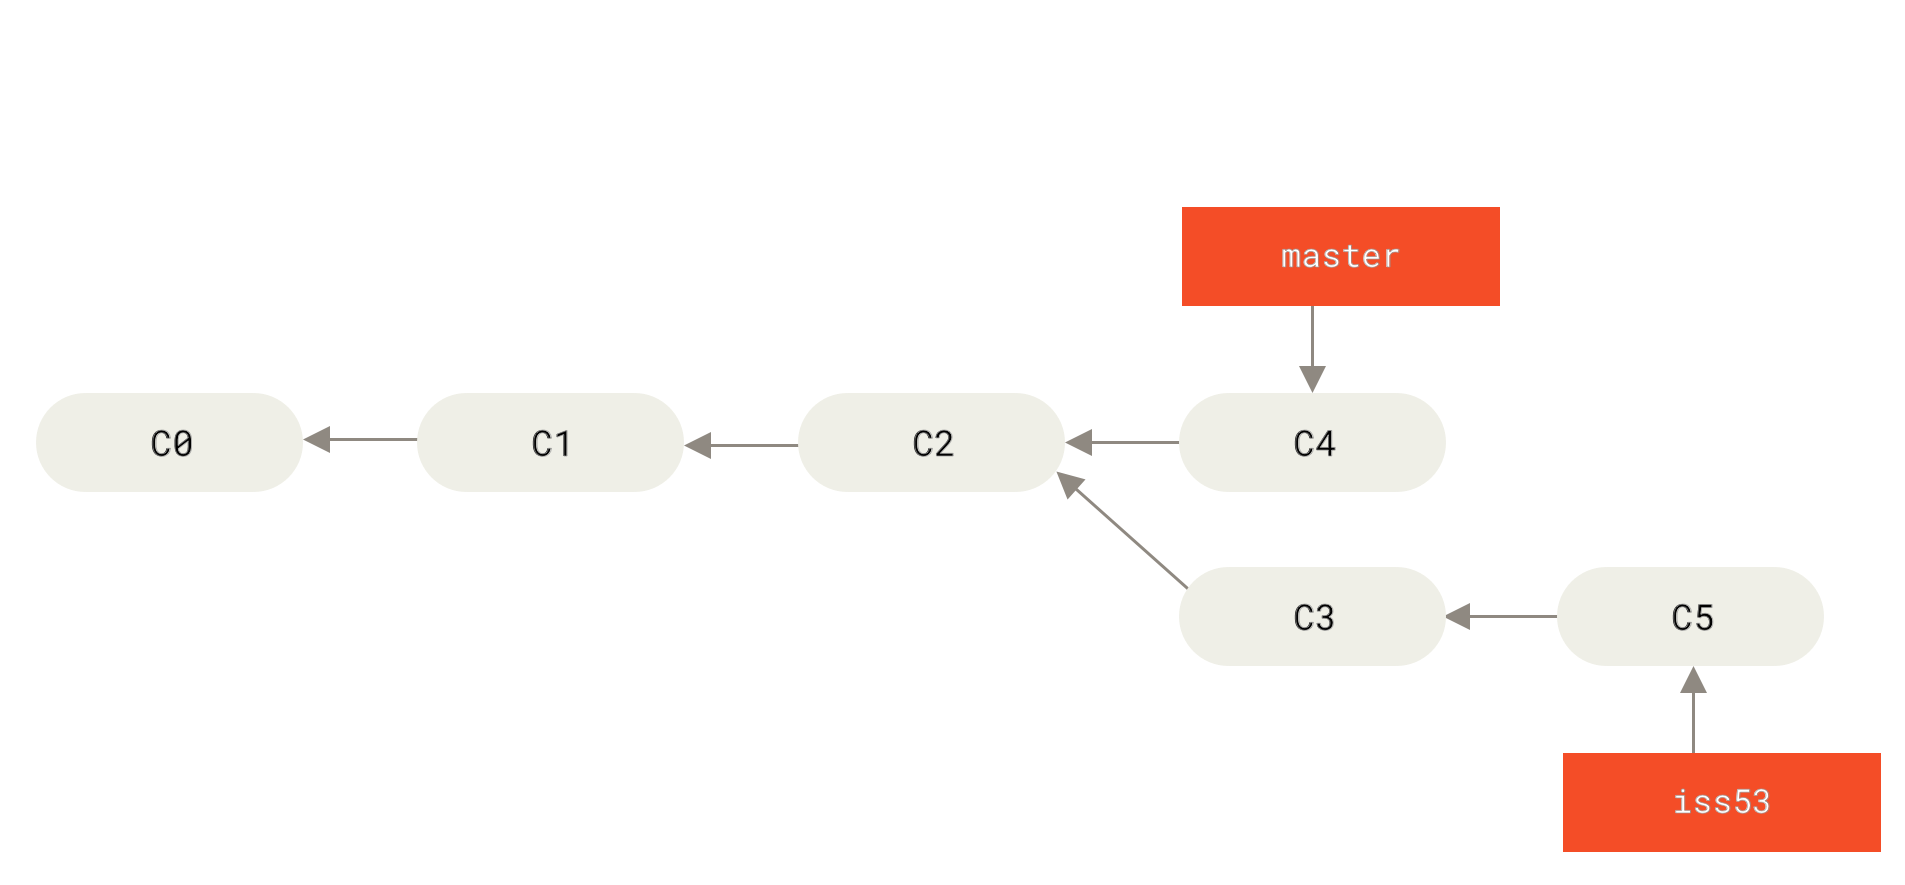
We create a branch for the hotfix. Image from the Git documentation.
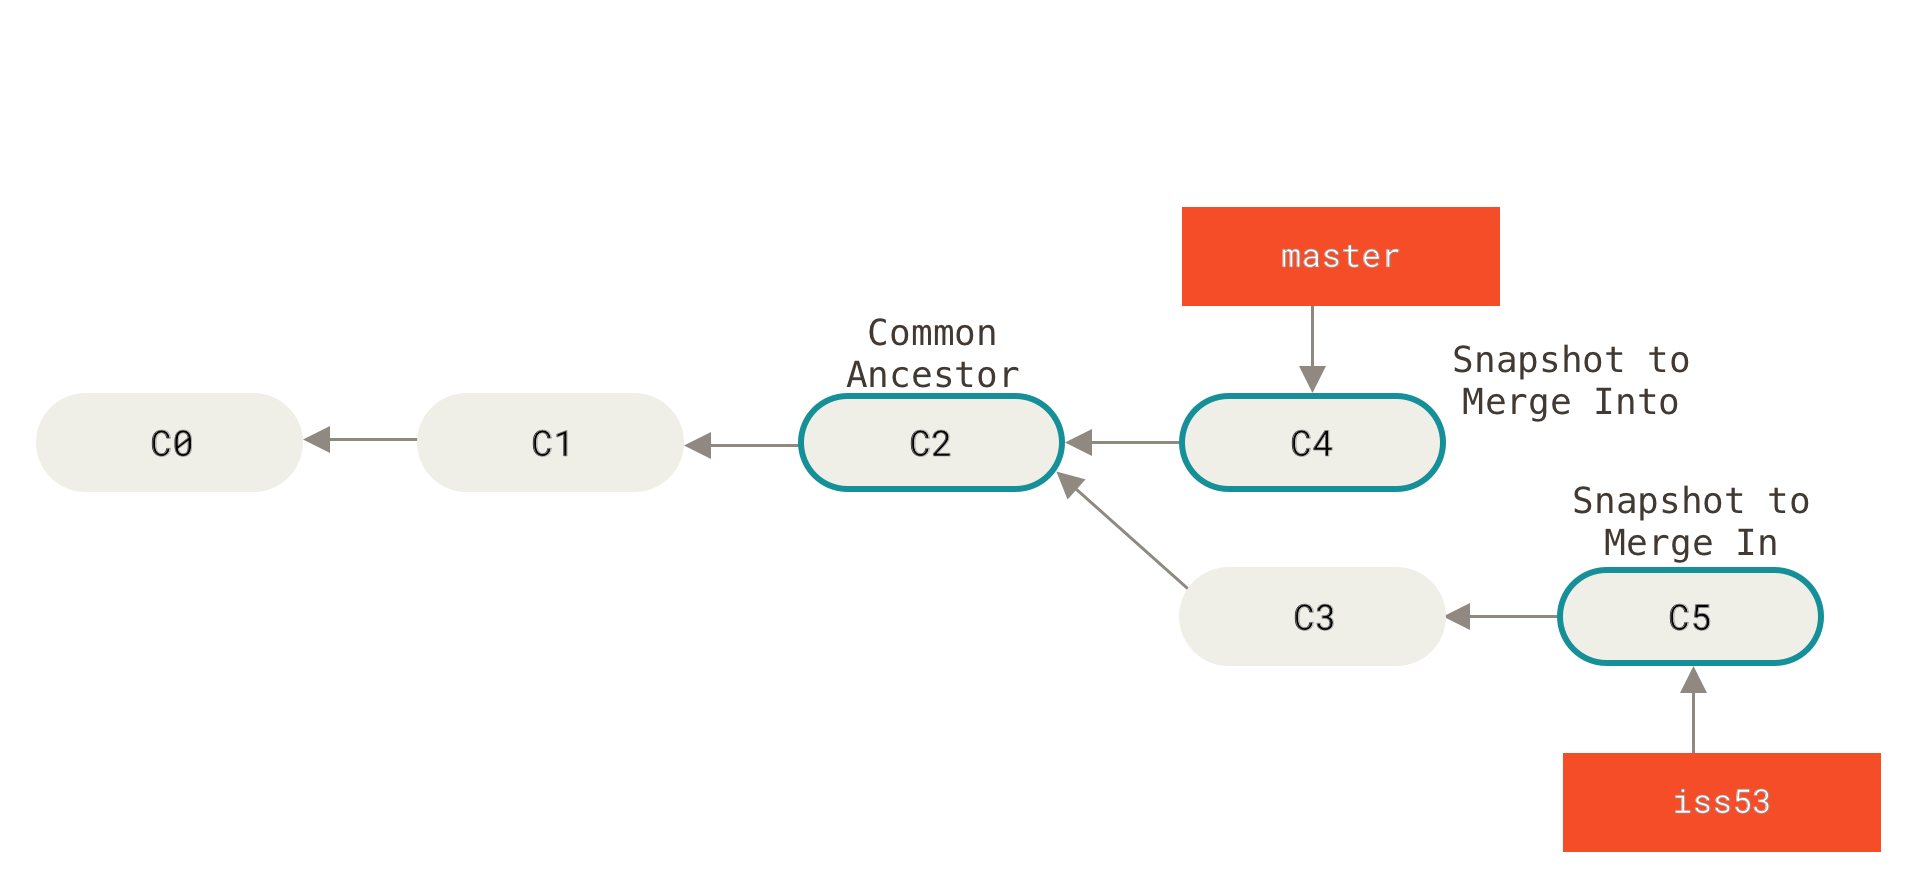
After the branch’s purpose is satisfied, we merge it back into master. Image from the Git documentation.
In a scenario where many developers are working on different parts of a project, you might imagine this branching system making our lives much easier.
But how do we do this in practice?
First, we create a new branch and check it out. We will use git checkout -b <new_branch_name> for this. This way we create and immediately check out this new branch (otherwise, if you just want to create it without checking out, use git branch).
git checkout -b new_amazing_featureDo your work.
# ...Let’s get back to the master branch and create a hotfix branch:
git checkout master
git checkout -b hotfix
Do your work.
# ...Good. At this moment, we have three branches. Check them using:
git branchYou should see something like this:
* hotfix
  master
  new_amazing_feature
Do your work, write your hotfix, and commit it on the hotfix branch. Now let’s merge it into master, delete the hotfix branch, and continue our work on new_amazing_feature:
git checkout master
git merge hotfix
git branch -d hotfix
git checkout new_amazing_feature
Merging
It would be odd to talk about branching and not about merging.
Suppose you are working in a branch where some line X is modified from the master branch. Also suppose that your colleague is working with that same line, but in another branch. He finishes his work. You finish your work. He sends his work to the repository. You send your work to the repository. Well. You can imagine what is coming, right?
At this point, someone will have to decide which version of line X will be merged into the master branch. This process is called a merge.
Unfortunately, it is not practical to walk through this example using a second person. So we will force this situation ourselves.
Create a new repository and initialize it with the following file main.c:
#include <stdio.h>

int main(){
    printf("Hello world!");
    return 0;
}
Do:
git init
git add main.c
git commit -m "Initial commit."
Now let’s work in two parallel branches:
git checkout -b branch_AChange main.c to:
#include <stdio.h>

int main(){
    printf("Hello dude!");
    return 0;
}
Add it to the staging area and commit it:
git add main.c
git commit -m "Changed the output to Hello dude"
Now create a new branch from master:
git checkout master
git checkout -b branch_B
Notice that main.c has the original content. Change it to:
#include <stdio.h>

int main(){
    printf("Hello mom!");
    return 0;
}
Add it to the staging area and commit it:
git add main.c
git commit -m "Changed the output to Hello mom"
Here we go. Come back to master and merge branch_A. We do this through git merge:
git checkout master
git merge branch_A
Check main.c. Now it has our first modification. Repeat this, but now for branch_B:
git merge branch_BBoom! Git tried to merge branch_B into master, but it noticed that both branches had the same commit as root and modified some content in parallel. Using the default merging strategy, Git could not solve this problem and passed it to the most intelligent person it had access to: you!
You probably received this error:
Auto-merging main.c
CONFLICT (content): Merge conflict in main.c
Automatic merge failed; fix conflicts and then commit the result.
It told you about the conflict situation and which files could not be automatically merged. When you open main.c, you will see something like this:
#include <stdio.h>

int main(){
<<<<<<< HEAD
printf("Hello dude!");
=======
printf("Hello mom!");
>>>>>>> branch_B

    return 0;
}
Git uses < and > to mark where we have a conflict. The first part holds the content in the branch that receives the merge. The second part holds the content in the branch that is being merged. Choose what should stay in the merged branch. I will say hello to mom!
#include <stdio.h>

int main(){
    printf("Hello mom!");
    return 0;
}
Add to the staging area and commit:
git add main.c
git commit -m "Merge."
Done. You solved the merge! Good work. If you look at git log, you may see something like this:
commit 162e0033c51bf59ed45ae50b0cbc47b2747092d8
Merge: 40e23c4 1844f02
Author: Pedro Alves <pdroalves@gmail.com>
Date:   Tue Mar 3 01:03:07 2015 -0300

    Merge.

commit 1844f02cb3857c99bc1446edd7216d68b18992a1
Author: Pedro Alves <pdroalves@gmail.com>
Date:   Tue Mar 3 00:56:12 2015 -0300

    Changed the output to Hello mom

commit 40e23c44ecb574731857a258f1f901169ff1edcd
Author: Pedro Alves <pdroalves@gmail.com>
Date:   Tue Mar 3 00:55:14 2015 -0300

    Changed the output to Hello dude!

commit 052ad3a49feb6fc78aaeae6971be5cf054612be5
Author: Pedro Alves <pdroalves@gmail.com>
Date:   Tue Mar 3 00:54:15 2015 -0300

    Initial commit.
Notice that the most recent commit has the message “Merge.”
Merging may be as easy as this or as hard as killing Wolverine. There are good tools that you can use to make your life easier. Google it!
And that’s it?
No! Git has many important features that we did not cover in this article. However, we presented the commands and the concepts that you should understand completely before playing with more advanced material.
References
We encourage you to take a look at Pro Git, by Scott Chacon and Ben Straub. It is an amazing book that is used as Git’s official documentation. This book is licensed under the Creative Commons and is available in many languages (even Portuguese).
The book is available online at git-scm.com/book.
Originally published on Coding N Tech.